
Configuring your portal's overall security policies
Portal access: Public or private?
An important choice is whether your portal should be public or private. The public or private setting can be found in your back office under Access > Security > Portal access.

If a portal is public, users do not have to sign in to Opendatasoft. Anyone online can visit your portal, which is indexed by search engines. Your catalog and any unrestricted datasets are visible to the general public.
Making your portal public doesn't mean that anybody will have access to all of your datasets!You're always able to limit what the general public sees by setting overall security parameters, as well as by defining parameters for specific, individual datasets if necessary. See our dataset security article for more information.
If a portal is private, users must be signed in to access your portal. You may define access rights for individual users or groups of users.
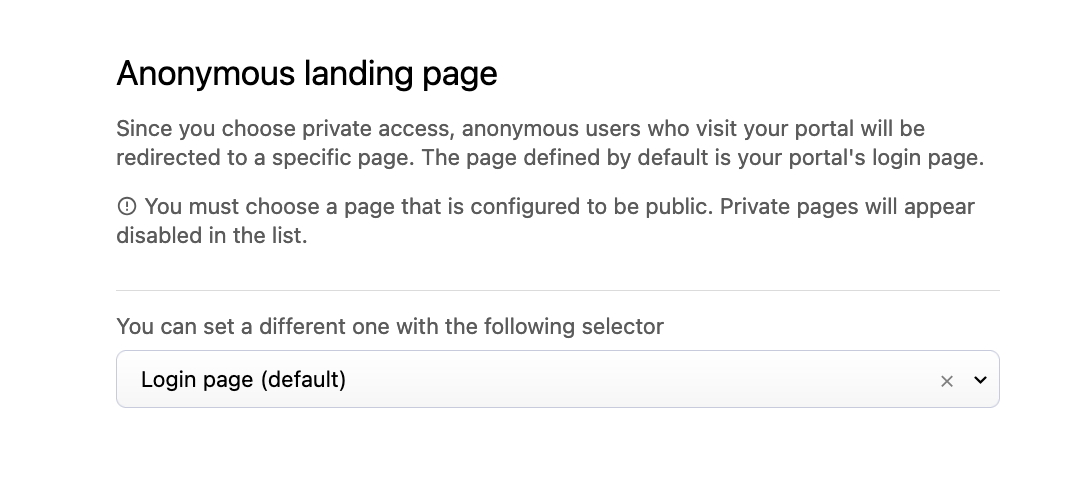
Note that if you decide not to allow anonymous users to access your portal, they will be redirected to the login page unless you'd rather they land on a specific page you've written.
Signup policy
No matter your choice of public or private, you can then decide on who will be able to become a registered member of your portal. In order to do this, go to the Access > Log in & Sign up in your portal's back office.
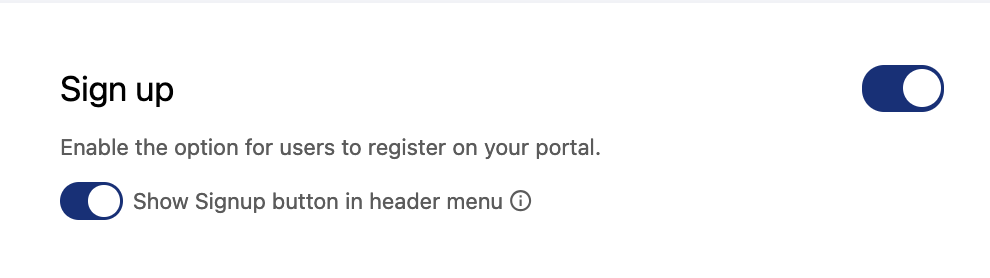
Don't forget to add the signup button to your header's menu, or people won't see a signup form until they try to access a restricted area of your portal.
Closed signup policy
If you decide not to allow people to signup freely, the only way of adding members to your portal will be through direct email invitations.
Open signup policy
If you allow people to register, you'll then have to decide whether you want to approve each access request to your portal manually or not. Note that whatever your decision, each member of the portal able to manage users will receive a notification for each new access request.
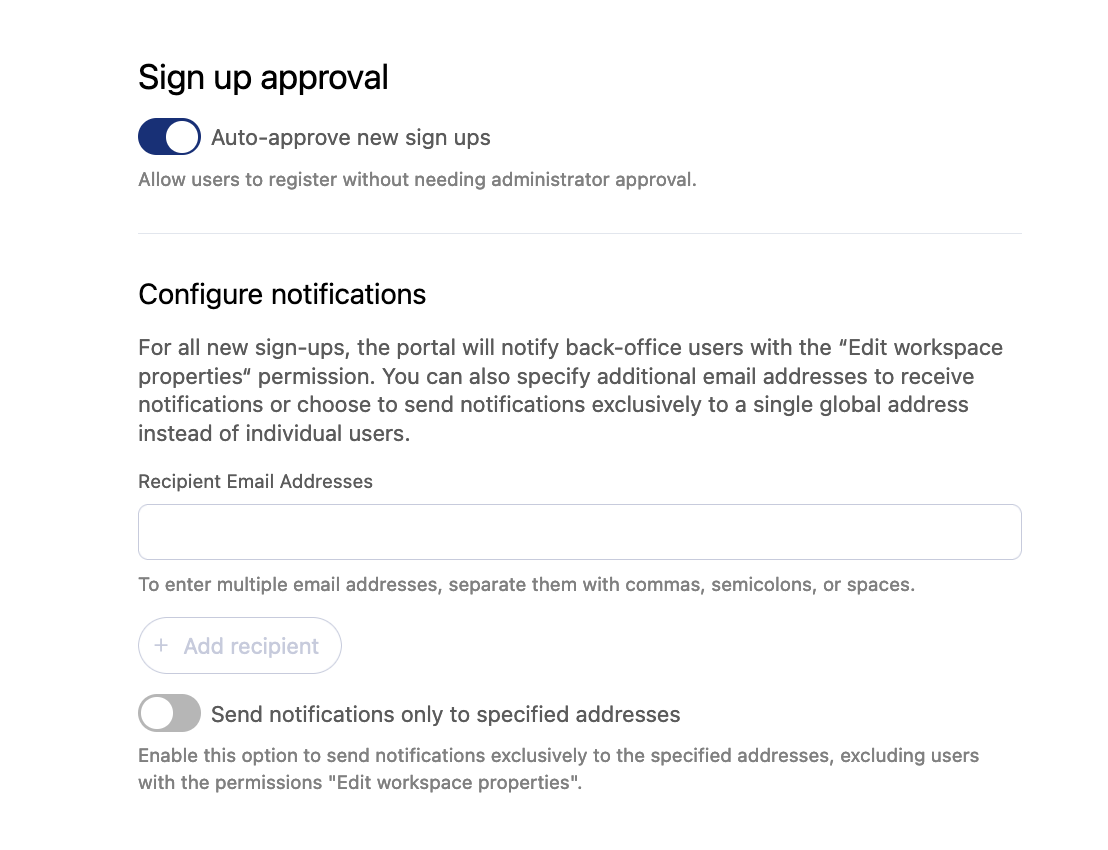
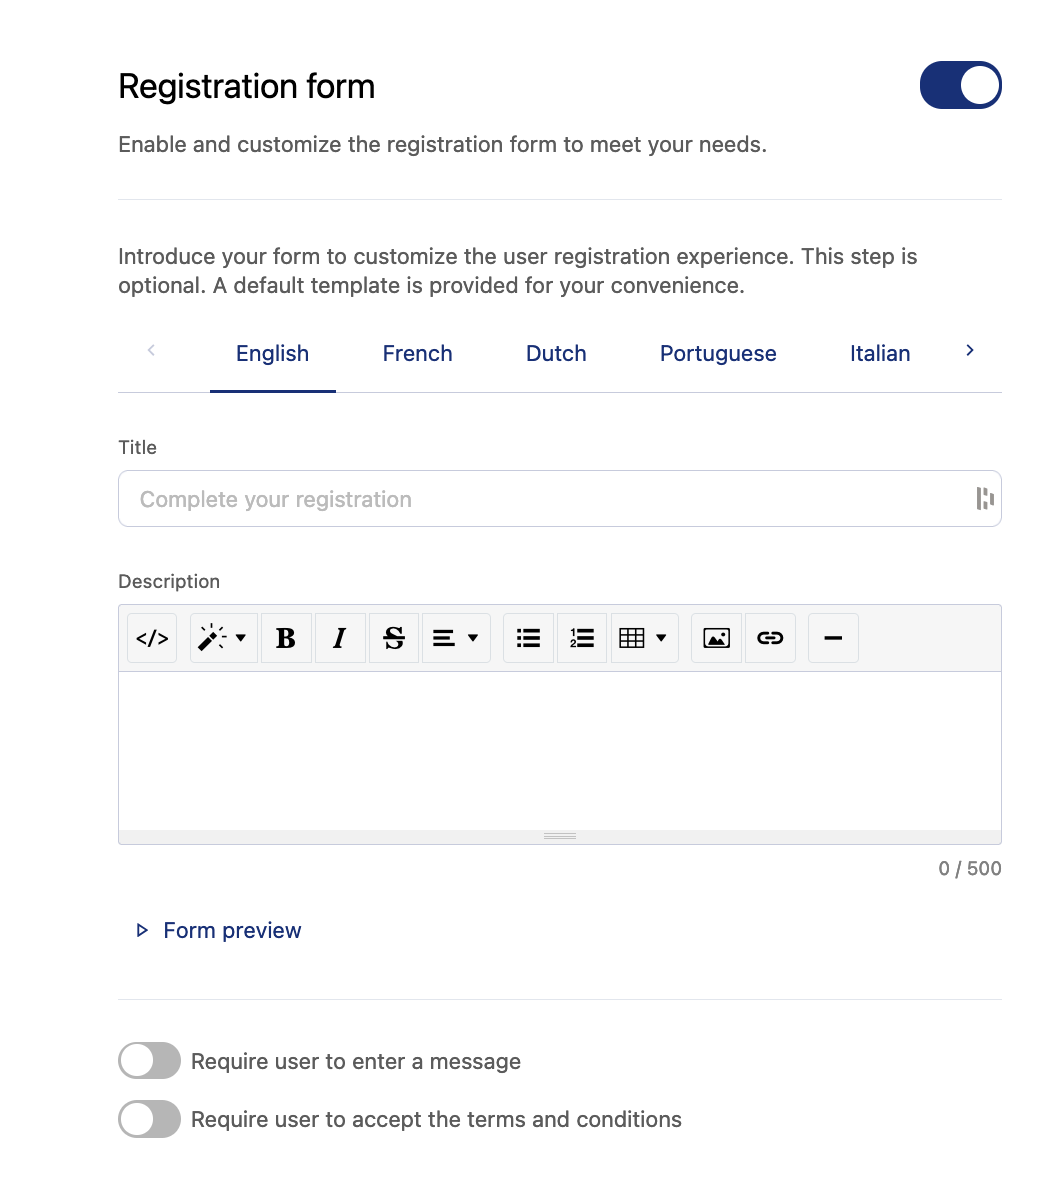
The signup process is usually very straightforward: an email, a password, and that's it. You can decide to customize the experience by setting up a custom text as a disclaimer, request users to accept your terms and conditions, and even require that they leave a message for the portal's administrator (useful when you want to manually approve access requests).
Registration form
Make new datasets private by default
When you create a new dataset, by default it's available to anyone with access to your portal. See here for more information on this setting.
New users' default permissions
You can set default permissions for all new users. See here for more information on using this tool.
reCAPTCHA activation
reCAPTCHA protects your public-facing forms from spam and abuse by distinguishing between humans and computers in your portal. This toggle is disabled by default.
If disabled, a rate limit is applied to restricts the number of requests a single IP address can make to the server within a period of time. This limit is not able to be modified. Please contact us if you encounter any issues.
Session management
Several settings are available in the Configuration > Security section of the back office to manage your users' sessions.
Idle timeout
By default, all authenticated users are automatically logged out after a two-week inactivity period. This duration, in minutes, can be customized here. Note that this setting is for idle users; every user request to the portal resets the timeout.
Maximum session duration
By default, all authenticated users are automatically logged out after a two-week period, even if they remain active (see "Idle timeout" above). This duration, in minutes, can be customized here.
Make session cookies persistent
By default, session cookies are set to be persistent in browsers until they expire on their own. However, you can choose for any active session cookies to be removed when the browser is closed. To do this, deactivate the toggle here.
Note that the behavior may change depending on the browser. Changing this setting only applies to new user sessions. Existing authenticated users will retain their previous cookie and its expiration date.
Single sign-on
If your organization already has its own identity management system, you can set up a bridge between your identity provider and your Opendatasoft portal. This will give general access to your portal to each of your organization's members.
Opendatasoft supports two types of identity providers:
About local users and linked users
When a SAML or an OpenID Connect identity provider is configured on a workspace, a user can belong to three categories.
A standard Opendatasoft user that was invited by email or signed up on a workspace:
This user logs in to the workspace using the standard sign-in interface with their usual Opendatasoft username and password and the account is accessible on the whole Opendatasoft network. Opendatasoft users are represented throughout the platform with the globe icon.
A local user that authenticates through the organization's identity provider:
This user logs in on the workspace exclusively via the organization's identity provider and, as it is only available on a specific workspace, it can be limited to the use of features relying on the Opendatasoft network. Local users are represented throughout the platform with the ID icon.
A linked user that has a standard Opendatasoft account, but is associated on this specific workspace with an identity from the organization's identity provider.
This user is a standard Opendatasoft user that can both authenticate through the Opendatasoft sign-in interface and the organization's identity provider. Since linked users are Opendatasoft users withSAMLorOpenID Connectauthentication abilities, they are represented throughout the platform with both the globe and ID icons.

Local user
Every user that has a user account on the identity provider trusted by a workspace and doesn't have an Opendatasoft user account can connect through. During the first connection, a local user will be created for the user based on the workspace's identity provider settings.
These local users have the permission to explore the public datasets of the workspace by default. Extra permissions can be given to these users at the level of the workspace, on individual datasets, or via groups (other than the SAML users or OpenID Connect users groups, of which they are automatically members).
The creation of new local users via an identity provider authentication can be disabled using the "Disable local user provisioning" checkbox in the identity provider configuration (SAML or OpenID Connect) configuration. Disabling local user provisioning will not prevent existing local users from signing in.
Linked user
Users that have an Opendatasoft user account can link this account to another account at the identity provider. This procedure is called account linking.
After the link has been established, linked users who log in through their identity provider will be logged in to their Opendatasoft user account. They'll still be able to log in with their Opendatasoft password, though.
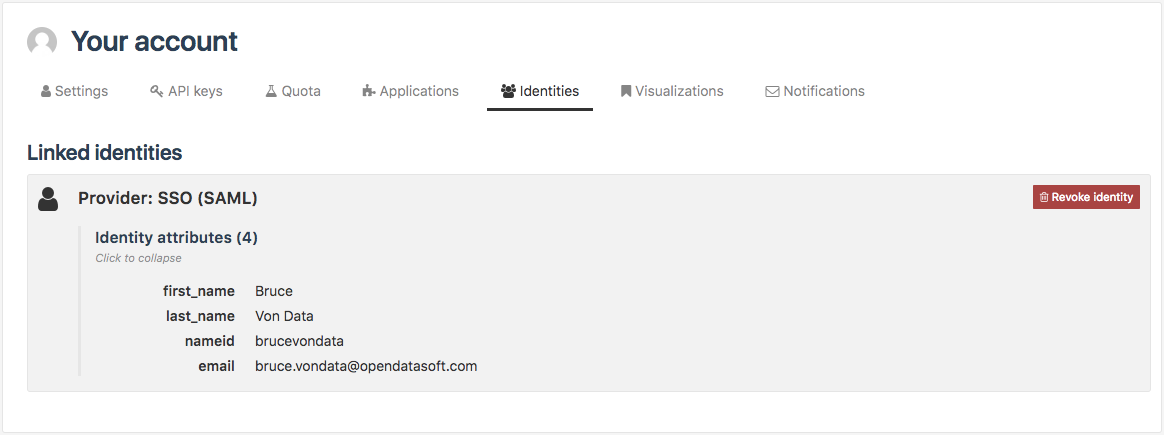
Click on Link your account to a SAML account on this workspace or Link your account to an OpenID connect account on this workspace in the identity tab of the user account settings:
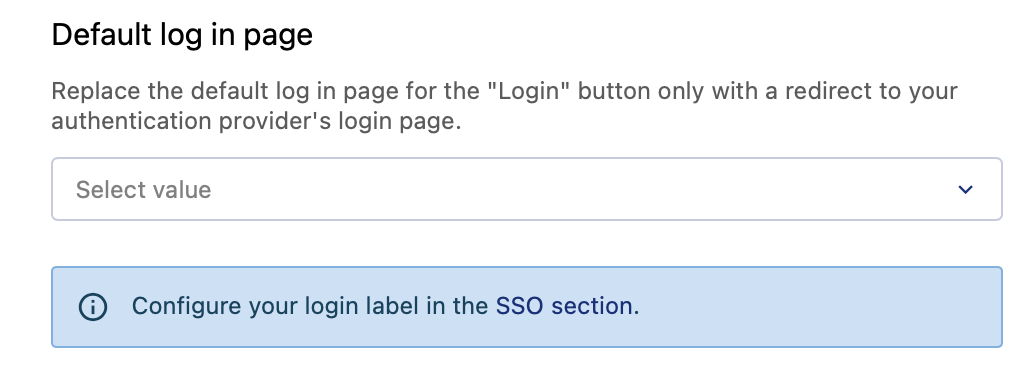
Default login page selection
The Opendatasoft platform allows to choose the login page that will be displayed to users when they click on a login link or try to access a restricted page.
If the identity provider login page is selected as default, the authentication flow (SAML or OpenID Connect) will be initiated automatically if an anonymous user clicks on the login link or try to access a restricted page like the back office. When the identity provider login page is selected, users who wish to connect to the platform using their Opendatasoft credentials have the option to do so by manually visiting the workspace's login page at https://<platform-url>/login/.
Using user attributes to filter data
Users who have been logged in through identity federation (SAML 2.0 or OpenID Connect) may have been set specific profile attributes. These attributes can be used to filter the content of the datasets these users can access.
To do so, you can edit the security configuration of a specific dataset and use the #attr function in the filter query of the SAML or OpenID Connect security group attached to the dataset. This way, users belonging to these groups will only see dataset records that match the filtering query, as explained below.
Through the #attr function, it is possible to filter dataset records in such a way that the only records returned are the ones that match a value set in the user attributes sent by the identity provider. For the following examples, we assume that we have the 3 users, with respective usernames and SAML attributes user-country and user-language:
User |
|
|
User1 | France | French |
User2 | Canada | French |
User3 | United States | English |
And a dataset with the following records:
|
|
|
Worldwide | English | Hello world |
France | French | Bonjour à tous les Français |
Canada | French | Bonjour à tous les Canadiens |
Canada | English | Hello to all Canadians |
United States | English | Hello to all Americans |
We can restrict these users so that they see only messages that apply to their respective countries, with the query #attr(country, user-country).
User1 sees
|
|
|
France | French | Bonjour à tous les Français |
User2 sees
|
|
|
Canada | French | Bonjour à tous les Canadiens |
Canada | English | Hello to all Canadians |
User3 sees
|
|
|
United States | English | Hello to all Americans |
We can also restrict these users so that they only see messages that are in their respective language, with the query #attr(language, user-language).
User1 sees
|
|
|
France | French | Bonjour à tous les Français |
Canada | French | Bonjour à tous les Canadiens |
User2 sees
|
|
|
France | French | Bonjour à tous les Français |
Canada | French | Bonjour à tous les Canadiens |
User3 sees
|
|
|
Worldwide | English | Hello world |
United States | English | Hello to all Americans |
Since it is a function of the query language, it can also be grouped with the usual operators. For example, we can restrict users to only seeing messages that fit their country and languages with the query #attr(language, user-language) AND #attr(country, user-country).
User1 sees
|
|
|
France | French | Bonjour à tous les Français |
User2 sees
|
|
|
Canada | French | Bonjour à tous les Canadiens |
User3 sees
|
|
|
United States | English | Hello to all Americans |