Keeping data up to date
Updated
by Anthony Pépin
- Using scheduling to keep a dataset up to date
- Adding a source
- Specifying scheduling interval
- Pushing realtime data
The Opendatasoft platform makes it possible to update the data within static datasets (which need to be published only once) and live datasets (which need to be regularly updated).
Two different mechanisms are available:
- Scheduling consists of having a dataset being automatically republished at fixed intervals. This mode is most useful for datasets with a remote resource that is regularly updated.
- Pushing realtime data on the Opendatasoft platform using a dedicated API endpoint. This mode is most useful when the data can be sent directly by the system that produces the data points, such as a computer program sending event metrics or a set of sensors sending their readings.
Using scheduling to keep a dataset up to date
Data in a dataset can be kept up to date by being automatically republished at fixed intervals. This is the easiest solution to implement. It does not require any coding, only a suitable source and some settings in the dataset configuration.
Note that scheduling updates only a dataset's data. Changes made to the configuration of your dataset will only be taken into account when you manually publish the dataset. This is by design, since datasets that are updated frequently—every minute is not unheard of—would offer you very little time to prepare whatever changes you wish to make to the configuration!
Adding a source
To schedule a dataset, you need to add a suitable source—a file via an FTP or HTTP address, or else a remote service. For more information, see Retrieving a file and Configuring a remote service.
Specifying scheduling interval
Once you saved a dataset with a remote source, the Scheduling tab is activated:

From this tab, you can add as many schedules as you want. For example, if it fits your needs, you could decide to schedule a dataset to be reprocessed every Monday morning and every Wednesday afternoon.
By default, the minimum scheduling interval is one day. Please contact Opendatasoft's support if you need minute-level scheduling in your workspace.
In standard time, this means schedules run on Central European Time (CET), or in other words GMT+1. In the summer months, schedules run on Central European Summer Time (CEST), or in other words GMT+2.
Note that in places that use Daylight Saving Time, countries can make the switch on different dates.
Pushing realtime data
For some types of data, it can be helpful to push data instead of the more traditional model of having the data being pulled from a resource by the platform. To address this need, the Opendatasoft platform offers a realtime push API.
It is not to be confused with the ability to schedule a dataset processing. When scheduling, the dataset will periodically pull the resource and process the data inside it. In contrast, with the push API, the dataset is fed by an application through a push API, and records are processed one by one as soon as they are received.
Configuring the dataset schema
- In Catalog > Datasets, click on the New dataset button.
- In the wizard that opens, select Realtime under the Configure a remote service section.
- In the Real time data schema box, enter some bootstrap data. The data should have all the fields that will be sent through the API.
- Configure Information and Alert Management options.
- Retrieve the push URL.
Using the push URL
After configuring the realtime source parameters, a URL path containing a push API key appears. This path, appended to your workspace's base URL, is where the platform will expect data to be sent after publication.
The data is expected to be sent in JSON format: - As a single JSON object for a single record - An array of JSON objects to push multiple records at once
A minimal example of the API usage for a dataset with a single field named message, using curl, would be:
curl -XPOST <WORKSPACE_URL>/api/push/1.0/<DATASET_ID>/<RESOURCE_ID>/push/?pushkey=<PUSH_API_KEY> -d'{"message":"Hello World!"}'
Here is the resulting dataset:

A minimal example with the same dataset, using the array form to send multiple records at once would be:
curl -XPOST <WORKSPACE_URL>/api/push/1.0/<DATASET_ID>/<RESOURCE_ID>/push/?pushkey=<PUSH_API_KEY> -d'[{"message":"¡Hola Mundo!"},{"message":"Hallo Welt!"}]'
If the records have been received correctly, the server will send the following response.
{
    "status": "OK"
}
If an error happens while trying to push a record, the response will specify the error.
Pushing a field of type file
To push a field of type image, a JSON object containing the base64-encoded content and the MIME type of the file needs to be sent:
{
    "image_field": {
        "content": "BASE64 data",
        "content-type": "image/jpg"
    }
}
Updating data by defining a unique key
Sometimes, it is useful to update the existing records instead of pushing new ones. To set up such a system with the Opendatasoft platform, the fields used as a unique key must be marked as so.
Procedure
To mark fields as a unique key, do the following:
- In the preview area of the Processing tab, click the wheel button of the field of your choice
- Select Unique ID
- Save and publish the dataset
If a new record whose key value is equal to an existing record is pushed, the new record will overwrite the old record.
Example
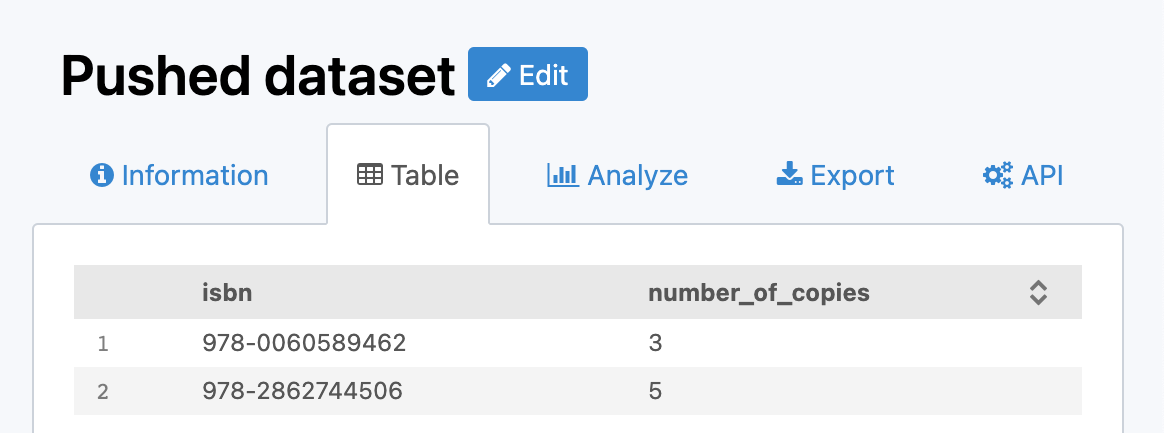
A dataset tracks the number of copies available for each book in a public library:

Suppose that this dataset contains two fields:
isbn, representing the ISBN number of the booknumber_of_copiestracking the current number of copies available in the library
In that case, it does not make sense to add one record for each new value of number_of_copies. Instead, it would be better to set the new number_of_copies value to the record corresponding to the book isbn.
In this example, the unique key would be isbn because the rest of the data is linked to individual books, and these books are identified by the ISBN.
If your dataset has isbn as the unique key and contains these two records:
[
    {
        "isbn": "978-0060589462",
        "number_of_copies": 3
    }, {
        "isbn": "978-2862744506",
        "number_of_copies": 5
    }
]
If somebody borrows a copy of Zen and the Art of Motorcycle Maintenance, and you push the following record:
{
    "isbn": "978-0060589462",
    "number_of_copies": 2
}
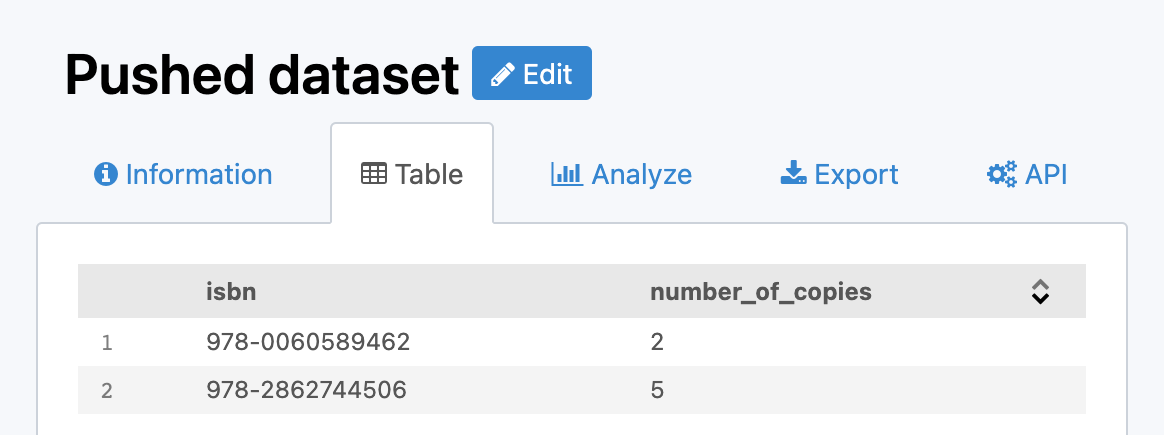
You will still have two records, the first one being updated with the new value:

Deleting data
Two endpoints allow for deleting pushed records. One that uses a record's values and one that uses a record's ID.
Deleting data using a record's values
To delete a record using its values, POST the record as if you were adding it for the first time, but replace /push/ with /delete/ in the Push URL. If your Push URL path is /api/push/1.0/<DATASET_ID>/<RESSOURCE_ID>/push/?pushkey=<PUSH_API_KEY>, then use instead /api/push/1.0/<DATASET_ID>/<RESSOURCE_ID>/delete/?pushkey=<PUSH_API_KEY>.
Here is an example to delete the record we pushed earlier:
curl -XPOST <WORKSPACE_URL>/api/push/1.0/<DATASET_ID>/<RESOURCE_ID>/delete/?pushkey=<PUSH_API_KEY> -d'{"message":"Hello World!"}'
Deleting data using the record ID
If you know the ID of the record you want to delete, make a GET request to the Push URL by replacing /push/ with /<RECORD_ID>/delete/:
curl -XGET <WORKSPACE_URL>/api/push/1.0/<DATASET_ID>/<RESOURCE_ID>/<RECORD_ID>/delete/?pushkey=<PUSH_API_KEY>
Delete all of the data from a dataset
The Push API does not allow you to empty a dataset of all its data, and this is not a method we recommend (instead, for example, an FTP server might be more appropriate).
However, as a workaround, you can use the Automation API to accomplish the same thing with a few API calls.
To delete the data, you simply need to unpublish and re-publish the dataset.
See the documentation for the Automation API for help unpublishing and publishing a dataset and for the URLs to call for these operations:
- Unpublish a dataset:
curl -X POST <DOMAIN_URL>/api/automation/1.0/datasets/<DATASET_UID>/unpublish?pushkey=<PUSH_API_KEY>
- Publish a dataset:
curl -X POST <DOMAIN_URL>/api/automation/1.0/datasets/<DATASET_UID>/publish?pushkey=<PUSH_API_KEY>
<DOMAIN_URL>/api/automation/1.0/datasets/?dataset_id=<DATASET_ID>Get notified in case of inactivity
If you expect a system to push data to the platform often, you may want to be notified if the platform has received no record in a while.
To get notified, perform the following steps:
- In Catalog > Datasets, click the desired dataset
- Display the desired source
- Click Alert management
- In the dialog box that opens, configure the alerting parameters:
- Select the Alerting check box
- Enter a threshold in minutes in the Inactivity alert check box
If a time span greater than the threshold has occurred during which no record has been received, you will receive an email.
Unpublishing and disabling the API
When unpublishing your dataset, existing records are not kept for the next time the dataset is published.
To avoid getting new data, perform the following steps:
- In Catalog > Datasets, click the desired dataset
- On the desired source, select

This will prevent the usage of the push API but will not affect existing data. If data is pushed while push is disabled, no data will be added, and an error will be sent.
Recovering data
In the event of data loss, for example, when the dataset has been unpublished or when a processor has been misconfigured, there is a possibility of recovering the lost records.
Every record received is backed up and eligible for recovery.
To recover eligible records, perform the following steps:
- In Catalog > Datasets, click the desired dataset
- On the desired source, select

How did we do?
How to find your workspace's IP address
Processing data
Table of Contents
- Using scheduling to keep a dataset up to date
- Adding a source
- Specifying scheduling interval
- Pushing realtime data
 Getting started
 Exploring and using data
 Publishing data
 Managing your users
 Managing your portal
